|
|

|
ePad LS (aka Programmer’s
Guide |
|
|
|
ePad LS (aka Programmer’s
Guide |
Table of
Contents
Inking
Mode v. Ready Mode – a new programming paradigm
No
more reporting of pen points outside the Inking Region
Deletion
of unneeded encryption modes
Deletion
of support for extraneous image formats
Revision
|
Date |
Version |
Requirements
Affected |
Authors |
|
|
Initial Writing |
|
|
|
|
|
|
|
|
|
|
|
|
|
|
|
|
|
|
|
|
|
|
|
|
|
|
|
|
|
|
|
|
|
|
|
|
|
|
|
|
|
|
Format of version text is [X]M.mT
X is optional and indicates a preliminary document
(not finalized) – it is always the letter ‘X’
M is a major revision, such as a complete overhaul – numeric
m is a minor revision, such as adding or deleting test cases or modifying
existing test cases – numeric
T is a trivial change, such as fixing formatting or spelling errors
When changing the version, select the new version text and reassign the pre-existing ‘RevNo’ bookmark to the new version text via the InsertàBookmark menu.
The ePad-LS is the next generation of
programmable signature capture device. Externally, it features a larger color
display and new styling. Functionally, it offers the programmer a new mechanism
for displaying documents, and the beginning of a new mechanism for programming
the device from a functional perspective rather than just manipulating the
screen and collecting pen data points.
This
document is divided into two parts. The first part is
a brief overview of the major functional changes in the ePad-LS
over the ePad Pro device. The second a series of
discussions of the programming models surrounding some of the device’s
major functional groups of commands.
Programmers
familiar with older ePad models will notice a
substantial difference in the way the ePad-LS is programmed. When an inking region is active, only a
limited set of commands can be sent to the device.
A new type
of abstraction, a text display window, is available to the programmer. This
window displays rich text formatted with the HTML tags as described in
Appendix-A of the product specification. The API (see programming guidelines
below) allows a programmer to define the location and size of the window, and
fill it with formatted text.
All earlier ePad models reported every touch of the stylus on the pad
back to the host. EPad LS now only reports touches inside an enabled inking
region. All other pen points are processed by the
device GUI but are not reported back to the host PC.
What this
means for button event processing:
This means
that programmers must be careful when creating buttons on the device. All
buttons must be in a defined inking region. If the screen contains only text
and buttons, be sure to turn the inking region PEN to OFF, so that the stylus
touching the button will not scribble ink trails on the button.
If the
programmer is defining a screen that contains a signing area as well as
buttons, the buttons must be inside the bounds of the inking region. To
minimize the appearance of ink trails on the buttons, choose an ink color that
is close to the button color.
ePad Pro supported several encryption modes between the host and
the COM object. For ePad LS, only the strongest of
those modes, 256-bit AES, is still supported.
Encryption
is an optional feature on the ePad LS. The API allows
an end user application to detect the ability of the device to communicate via
an encrypted channel.
EPad pro
supported the GIF,
PNG and TIFF image formats in addition to the more commonly used
JPEG and Windows BMP format. In the ePad LS, only
support for JPEG and BMP remains.
There are a
few caveats about bitmaps which are noteworthy. Bitmap transport across USB is
slow. This is because bitmap files
are relatively large, even for a small LCD such as the one that is present in
the
Encryption
is an optional feature on the ePad-LS. Devices which support encryption and those which do not
share the same Product ID, and the encryptability of
devices is noted in the structure returned by the GetPadInfo routine.
Note: If a
device supports encryption, a special bitmap (ID=255) will be created with a
“lock” logo and displayed on the screen in the default
configuration.
connGetEncryptionMode – This command reports the current encryption MODE. Note that the encryption MODE is
different from the encryption capable flag. Devices which do not
support encryption always report NONE for the encryption mode.
connSetEncryptionMode – This command turns
encryption on or off on devices that support encryption. On devices that do not
support encryption, this command returns an error. This command is only
available in READY mode.
To hide the
encryption icon – Following
VB6 sample code shows how to hide the encryption icon on the device:
Dim encrypticonBmpId as Integer
'make sure the inking was disabled
'If it is in the
inking mode(3), then disable it
nRet = ePadLSActiveX1.connGetMode(mode)
if ( nRet AND mode = 3 ) Then
nRet = ePadLSActiveX1.connGetInkRegion(enable, inkon, etype, transform, leftx, lefty, rightx, righty, red, green, blue, alpha, penWidth,
inksecond)
If (nRet)
Then
enable = 0
nRet =
ePadLSActiveX1.connSetInkRegion(enable, inkon, etype, transform, leftx, lefty, rightx, righty, red, green, blue,
alpha, penWidth, inksecond)
EndIf
EndIf
if ( nRet ) Then
'to hide
the encryption icon which bitmap id is 255 encrypticonBmpId = 255
OnOff = 0
nRet = ePadLSActiveX1.connShowBitmap(encrypticonBmpId, OnOff)
EndIf
The Text
Window is a high-level GUI object that supports the display of Rich Text in a
scrolling window on the device. The Rich Text formatting language is an
HTML-derived language that gives the programmer control over the size of the
text display, as well as the fonts, color and Bold/Italics/Underline attributes
of the text.
The
following commands control display of text on the device:
·
connSetTextWindow – Define
the size and location of the Text Window
·
connSetTextWindowDisplay – Show
or Hide the text window.
·
connSendTextForTextWindow –
Populate the text window with a Rich Text file.
If the
rendered text file is larger than the defined window, a scrollbar will appear
on the right edge of the window, controllable by the user with the stylus.
Word-wrap is
automatic, and no horizontal scrollbar will ever appear.
The text
window can be moved, resized or repopulated while it is being
displayed. This is a fast operation with minimal or no flicker. The
scrollbar creation is a dynamic function and will be managed
at all times as a function of the size and the amount of text to be displayed.
The text
window cannot be destroyed. When the programmer does
not want to see the scrollbar on the screen, it should be
hidden.
Bitmap
management is slightly changed from previous products.
Unmodified
Commands:
·
connCreateBitmap** - behavior changed see below.
·
connDeleteBitmap
·
connCreateEmptyBitmap
·
connDrawLine
·
connClrInkRegion
Deleted
Commands:
·
connClrScreen – This functionality can be achieved by creating an
empty bitmap the size of the entire screen.
·
connCopyImage – This command was deemed
overly complex and provided functionality that while useful in a greyscale display, was not readily migrated to a color
display. It has been replaed by the connDisplayBitmap command.
There are
three new commands.
·
connShowBitmap (1). It will put the bitmap on the
display at the coordinates specified. If two non-default bitmaps are
overlapping on the display, the last one to be created
will be on top. The default bitmap will be behind all other bitmaps.
·
connShowBitmap (0). It will remove the bitmap from the
display revealing whatever was beneath it previously.
·
connSetBitmapAsDefault. This command makes the specified
bitmap the default. Note that this bitmap will be displayed
on the screen at coordinates 0-0 at power on. If it is not a full-screen bitmap
then portions of the screen will have no coverage.
·
connSendNewBitmapText This command is passed a
bitmap ID and a RichText text string to be displayed
in the bitmap. The RichText encapsulates the font,
color and size of the text. The rich Text will be rendered
in the center of the bitmap.
Note that
the inking region and its affirmation text will always be in front of all
bitmaps, and the text display will also be in front of
all bitmaps. If the text display and the inking region overlap, the one
that is created first will remain in the back, though
that might change.
On devices
that support encryption, a special bitmap with ID 255 will be
created at boot time. The image for this bitmap is a lock, and will be displayed in the lower right corner of the device.
The device programmer may turn this bitmap off or move it with the usual Bitmap
manipulation commands.
**Note that
the connCreateBitmap command can
only be passed a bitmap ID previously passed to a connCreateEmptyBitmap
command. The connCreateBitmap command will populate
that bitmap with the image file specified.
To set the default background image – Following VB6 sample code shows how to set
the default background image on the device:
'In the non-inking mode
'make sure the inking was disabled
'If it is in the inking mode(3), then disable it
nRet =
ePadLSActiveX1.connGetMode(mode)
if ( nRet AND mode = 3 ) Then
nRet =
ePadLSActiveX1.connGetInkRegion(enable, inkon, etype, transform, leftx, lefty, rightx, righty, red, green, blue,
alpha, penWidth, inksecond)
If (nRet) Then
enable = 0
nRet =
ePadLSActiveX1.connSetInkRegion(enable, inkon, etype, transform, leftx, lefty, rightx, righty, red, green, blue,
alpha, penWidth, inksecond)
EndIf
EndIf
If ( nRet ) Then
'Create
a empty bitmap with full screen and white background
mapid = 2
nRet =
ePadLSActiveX1.connCreateEmptyBitmap(mapid, 320, 234,
255, 255, 255, 255)
If (nRet) Then
'Text1 points to a jpg or
bmp file with 320*234 pixel attributes
'For example, a new defaultbmp image is stored at the epad
dir
Text1 = "C:\program
files\Interlinkelectronics\ePad\defaultbmp.jpg"
'download
the bitmap to device
nRet = ePadLSActiveX1.connCreateBitmap(mapid, Text1)
If (nRet)
Then
'set up bitmap
2 as default bitmap!
nRet =
ePadLSActiveX1.connSetBitmapAsDefault(mapid);
EndIf
EndIf
EndIf
There is no
support for buttons, per se, on the
There are basically two COM methods which can be used to draw the
buttons on the
When the user signs on the ePad, the pen data is delivered to
the
This is paramount in understanding
how to program the 3rd party software to
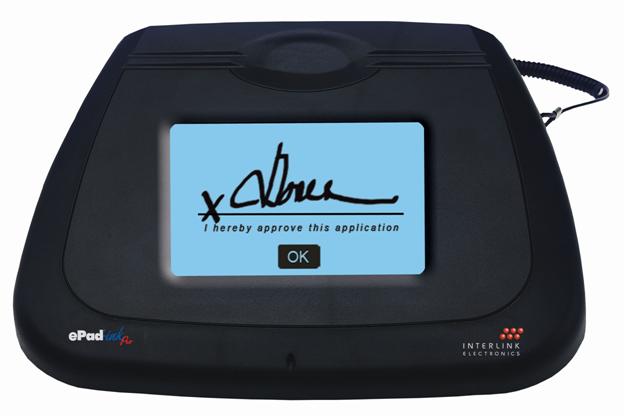
respond to pen-data. Consider the
diagram below. Clearly, this
example shows an instance where there is no contention because the signature
does not extend into the area occupied by the button. What is reported
from the pad to the
Now, in
contrast, consider the following diagram.
Notice how the signature extends below the signature line and into the
space occupied by the OK button.
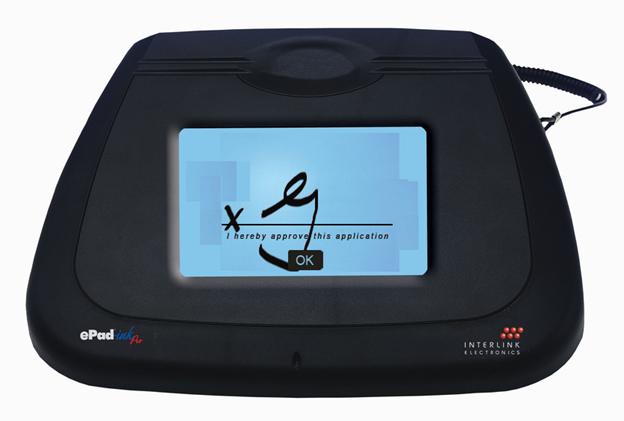
In either case, the OK button is pressed AFTER the pen-lift has occurred. When the OK button is pressed, the pen-data reflects this just the same as when the signature data occurs. One or more points are returned with the pen-down flag set, followed by a single point with the pen-down flag reset.
Therefore, as a general rule, these are the steps to be taken in designing 3rd party software to collect signature data in conjunction with a button-press on the ePad:
1.
Download the image to the
2.
Obtain pen-data from the
3. If this point is in the area defined by a button, continue at step 7
4. Save data point as part of the signature data
5.
Obtain next pen-data point from the
6. If pen-down is set, continue at step 4, otherwise, continue at step 2
7.
Current point is a button-press, so process
according to correspondin
So, as long as the stylus is maintaining contact with the ePad, even if it is on the region defined by a button, it will be considered as signature data. If the stylus lift occurs, followed by stylus down on a button, then the touch will be considered as a button-press.
If this procedure is followed, then there should be no ambiguity on the action
of the pen-data when buttons co-exist with a signing area on the ePad
As an
example, the following program code has been provided
as an aide to host PC
void CRedCross::PenDataProcess(void *pContext, INT abs_x, INT abs_y, INT pressure, C
{
CDeviceState *pState = (CDeviceState*)pContext;
if (0 == pState->fTouch && 0 != fTouch) {
if ((dwTimeStamp - pState->dwTimeStamp) > 300) {
if (IsButtonClicked(pState->button1,
abs_x, abs_y)) {
SetEvent(pState->button1.hClickEvent);
} else if (IsButtonClicked(pState->button2,
abs_x, abs_y)) {
SetEvent(pState->button2.hClickEvent);
} else if (IsButtonClicked(pState->button3,
abs_x, abs_y)) {
SetEvent(pState->button3.hClickEvent);
} else {
pState->dwPointCounter++;
}
} else {
pState->dwPointCounter++;
}
}
pState->fTouch
= fTouch;
pState->dwTimeStamp
= dwTimeStamp;
}
BOOL CRedCross::IsButtonClicked(CDeviceButton& button, INT abs_x,
INT abs_y)
{
INT lcdX = (INT)(abs_x
* 320.0/32768);
INT lcdY = (INT)(abs_y
* 234.0/32768);
return (BOOL)(button.x1 <
button.x2 &&
button.y1 < button.y2
&& button.x1 <= lcdX
&& button.x2 >= lcdX
&& button.y1 <= lcdY
&& button.y2 >= lcdY);
}
·
Do
not attempt to change the font face in text sent to the text window via the
<FONT> tag. In this pre-release version, the font face is
not yet completely supported and may result in a restart of the text
window manager, clearing all text in the process.
·
Affirmation
text is not yet supported in this pre-release version (connSendAffirmationText)
·
Line
drawing is not yet supported in this pre-release version (connDrawLine)
·
The
dependency flag in the create inking region command is
not currently supported.
·
When
a bitmap is set to be the default, the default will take effect once the
To enable
inking trace on the device - Following
VB6 sample code shows how to show the ink trace on the device:
'First to get the
current inkRegion settings
nRet = ePadLSActiveX1.connGetInkRegion(enable, inkon,
etype, transform, leftx,
lefty, rightx, righty, red,
green, blue, alpha, penWidth, inksecond)
If (nRet) Then
'set the
inking to be on all the time
inkOn = 1
inksecond = 0
nRet = ePadLSActiveX1.connSetInkRegion(enable, inkon, etype, transform,
leftx, lefty, rightx, righty, red, green, blue, alpha,
penWidth, inksecond)
EndIf
 1.5.4
1.5.4